Evaluating the Costs and Financial Factors of Ductless Mini Split Installation
Many of us are constantly searching for smarter ways to manage our home’s comfort and energy use. Did you know that heating and cooling can account for over half of our household energy consumption? This makes selecting an efficient system incredibly important. What’s more, poor installation can lead to up to 30% efficiency loss, and indoor air can be significantly more polluted than outdoor air.
Ductless mini-splits offer a flexible and energy-efficient solution. They provide targeted heating and cooling without the need for extensive ductwork. But is a DIY installation within your reach, or should you call in a professional?
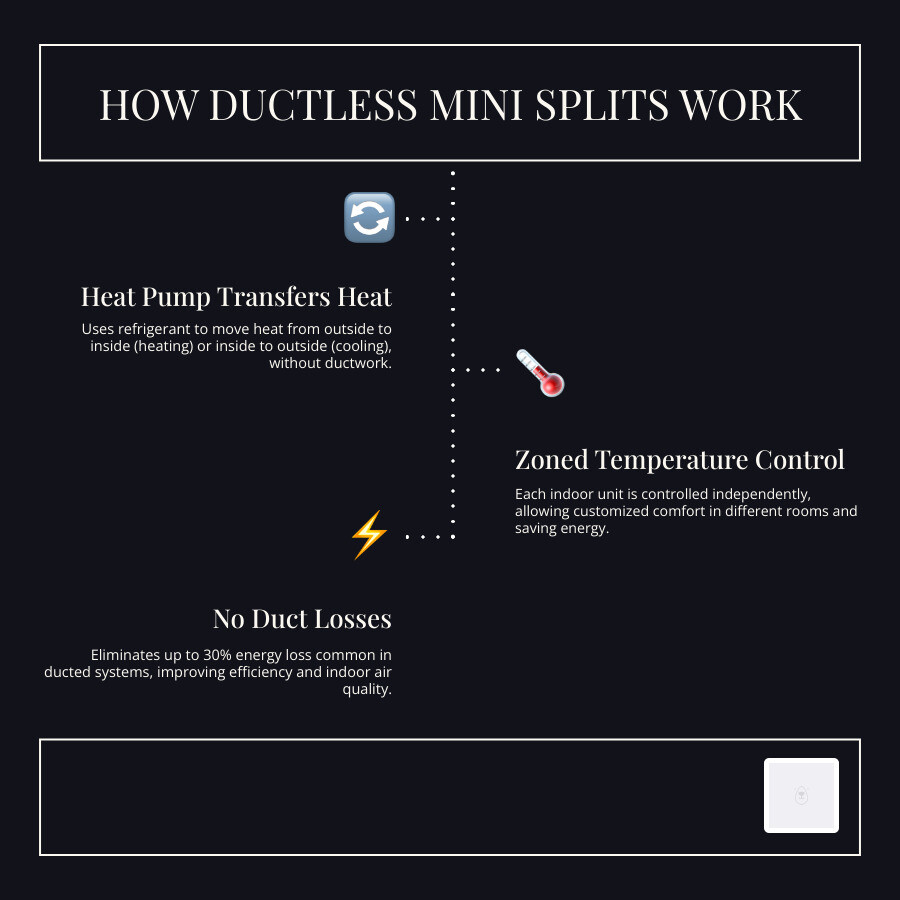
This extensive guide aims to help you navigate these questions. We will explore everything you need to know about ductless mini split installation. This includes choosing the right system, understanding costs, step-by-step procedures, and crucial safety precautions. Whether you’re considering a full DIY approach or a hybrid model, we’ll give you the insights needed to make informed decisions for your home’s comfort and efficiency. For those seeking professional guidance or ready to explore options for their specific needs, understanding expert advice on ductless mini-splits and installations can be invaluable.
When considering a ductless mini split system, one of the first questions homeowners ask is about the cost. The investment can vary significantly, depending on several factors, but understanding these elements upfront will help you budget effectively and make informed decisions.
A typical ductless mini split installation can range from $2,000 to $7,000 per zone. This means a single-zone system, designed to heat or cool one specific area, usually falls between $2,000 and $6,000. For multi-zone systems, which connect multiple indoor units to a single outdoor condenser, the cost is generally between $2,000 and $7,000 per zone.
Several factors influence this price range:
- System Size and Capacity (BTUs):Larger rooms or areas with higher heat loads require units with higher British Thermal Unit (BTU) ratings, which are typically more expensive.
- Number of Zones:A multi-zone system, while offering customized comfort, involves more indoor units, more extensive line sets, and more complex wiring, increasing overall costs.
- System Efficiency (SEER2 Rating):Higher Seasonal Energy Efficiency Ratio 2 (SEER2) ratings indicate greater energy efficiency, leading to lower operating costs in the long run. While these units may have a higher upfront price, they can result in significant energy savings over the system’s lifespan.
- Installation Complexity:Factors like the distance between indoor and outdoor units, the need for electrical panel upgrades, or challenging wall penetrations can increase labor costs.
- Indoor Unit Styles:Standard wall-mounted units are generally the most affordable. However, options like ceiling cassettes, floor-mounted units, or concealed ducted units require more intricate installation and can drive up the price.
- Contractor Selection:Professional installation costs vary by region and the specific HVAC contractor. While a DIY approach might seem cheaper initially, the cost of specialized tools and the risk of improper installation can quickly negate any savings.
Comparing Installation Costs: Single-Zone vs. Multi-Zone
Sizing, Location, and Pre-Installation Planning
Before you even think about picking up a tool, thorough planning is paramount. Correctly sizing your mini split system and choosing optimal locations for both indoor and outdoor units will directly impact its efficiency, performance, and longevity.
Choosing the Right System Size and Indoor Location
Sizing (BTU Requirements): One of the most critical steps is performing a proper load calculation to determine the correct BTU capacity for your space. Oversized or undersized systems can both lead to inefficiencies, discomfort, and premature wear. While a common rule of thumb is 20-25 BTUs per square foot, this is merely a starting point. Factors like ceiling height, insulation quality, window size and orientation, and local climate conditions all play a significant role. For example, a 12,000 BTU unit typically covers 300 to 550 sq ft, while a 24,000 BTU unit might handle 1,000 to 1,200 sq ft. Always aim for a professional load calculation rather than relying solely on estimates.
Indoor Unit Location: The placement of your indoor unit profoundly affects air distribution and system efficiency.
- Clearance Rules:Ensure adequate clearance around the unit for optimal airflow and future service access. A minimum of 6 inches (152mm) above the unit is generally recommended, though some models might allow as little as 3.2 inches (80mm) if side clearances are met. Avoid installing the unit higher than 10 feet from the floor for effective air circulation.
- Mounting Height (R-32 Safety):For units using R-32 refrigerant, a mildly flammable A2L gas, some manufacturers specify a minimum indoor unit installation height of 5.9 feet (1.8 meters) from the floor. This is a safety measure to ensure that, in the unlikely event of a leak, the refrigerant concentration doesn’t reach a flammable level in the immediate breathing zone.
- Wall Studs:The indoor mounting bracket must be securely anchored into at least one, and ideally two, wall studs to support the unit’s weight.
- Environmental Restrictions:Avoid areas with high humidity (like bathrooms), direct sunlight, or near heat sources. Also, keep the indoor unit at least 3.28 feet (1 meter) away from other electrical devices like TVs, radios, or computers to prevent electromagnetic interference (EMF).
- Room Area (R-32 Safety):For R-32 systems, the room must meet minimum area requirements based on the refrigerant charge to ensure safety in case of a leak. Consult your specific unit’s manual for these calculations.
Outdoor Unit Location: The outdoor condenser also requires careful placement. It should be on a stable, level surface, ideally a pre-cast concrete pad, and raised above ground level if necessary to protect it from snow and debris. Ensure at least 12 to 18 inches of clearance around the unit, with 18 to 24 inches minimum on the fan discharge side, for proper airflow. Avoid placing it directly under windows or near bedrooms due to potential noise, although modern mini splits are designed to be very quiet.
DIY vs. Professional: Deciding Your Installation Path
The question of whether to install a mini split yourself or hire a professional is complex. While many components of the installation are within the capabilities of a handy homeowner, certain critical steps demand specialized knowledge, tools, and certifications.
DIY Limitations and Legal Requirements: The most significant hurdle for a pure DIY installation is the handling of refrigerants and electrical connections. In most U.S. states, federal law requires an EPA Section 608 certification to purchase, handle, and connect refrigerant lines. This means that while you might be able to mount the units and run the line sets, a licensed HVAC professional is legally required to perform the vacuuming of the system and the release of refrigerant. Similarly, complex electrical connections often require a licensed electrician or an HVAC professional with appropriate electrical qualifications, and local permits are almost always necessary for electrical work. Attempting these steps without proper certification can be illegal, dangerous, and may even void your system’s warranty.
The Cost of Specialized Tools: Another factor weighing against a full DIY approach is the cost of specialized tools. A vacuum pump, manifold gauge set, flaring tool, and torque wrench are essential for proper installation. Purchasing or renting these tools for a one-time project can sometimes cost more than simply hiring a professional to handle the entire installation from the start. As one HVAC professional put it, comparing DIY mini-split installation to buying a vehicle kit, assembling it yourself, and then attempting to drive it down the road, emphasizes the high risk and need for specialized tools.
The Hybrid Approach: Many homeowners opt for a “hybrid DIY” approach. This involves handling the physical mounting of the indoor and outdoor units, drilling the wall penetration, and running the line sets and wiring conduit themselves. Then, they hire a licensed HVAC technician to complete the crucial steps: making the final refrigerant line connections, vacuuming the system, releasing the refrigerant, and making the electrical connections. This can save on labor costs while ensuring the critical technical aspects are handled safely and correctly by a certified expert.
Warranty Implications: It’s crucial to check your manufacturer’s warranty. Many mini split manufacturers void the warranty if the system is not installed by a licensed HVAC professional. This is a significant consideration, as a voided warranty could lead to expensive repair costs down the line.
Essential Tools and Materials for the Project
Whether you’re doing a full DIY or a hybrid installation, having the right tools and materials is crucial. There’s nothing more frustrating than stopping mid-install for a hardware store run.
For Mounting and Basic Setup (DIY-Friendly):
- Drill and Hole Saw:For drilling the wall penetration (typically 2.5 to 3.5 inches in diameter).
- Level:To ensure indoor and outdoor units are perfectly horizontal for proper drainage.
- Stud Finder:To locate wall studs for secure mounting.
- Tape Measure:For accurate placement and clearances.
- Wrenches and Screwdrivers:Basic hand tools for assembly.
- Caulking Gun and Sealant:To seal the wall penetration.
- PVC Line Cover/Raceway:To protect and conceal the line set.
- Safety Glasses and Gloves:Always prioritize personal safety.
For Refrigerant and Electrical Connections (Professional/Hybrid):
- Vacuum Pump:Essential for evacuating air and moisture from the refrigerant lines.
- Manifold Gauge Set:To monitor pressure during vacuuming and refrigerant charging.
- Flaring Tool:To create precise flares on copper refrigerant lines for leak-proof connections.
- Torque Wrench:Crucial for tightening flare nuts to manufacturer specifications, preventing leaks.
- Wire Strippers and Crimpers:For electrical connections.
- Voltage Tester:To ensure power is off before working on electrical components.
- Multimeter:For checking electrical circuits.
- Refrigerant Leak Detector:To confirm no leaks after connections are made.
- 14/3 or 14/4 Wire:For connecting indoor and outdoor units (check manufacturer specs).
- Dedicated Circuit Breaker and Disconnect Switch:Often required by code for the outdoor unit.
Step-by-Step Guide to Mounting and Connecting Your System
Once you’ve decided on your installation path and gathered your tools, it’s time to get to work. This section breaks down the physical installation process, highlighting key considerations for each step.
The Step-by-Step Guide to a Successful Ductless Mini Split Installation
Mount the Indoor Unit:
Attach Mounting Plate:Securely fasten the metal mounting plate to the wall, ensuring it’s level and anchored into at least one, preferably two, wall studs. This plate will bear the weight of the indoor unit.
Drill Wall Opening:Using a hole saw, drill a 2.5 to 3.5-inch diameter hole through the wall, angled slightly downward (0.2 to 0.275 inches or 5-7mm) towards the outside. This downward slope is critical for proper condensate drainage and prevents water from leaking back into your home. Insert a protective wall cuff into the drilled hole to protect the edges of the piping and cables.
Route Lines:Carefully route the refrigerant lines, electrical cables, and condensate drain hose through the wall hole.
Hang Indoor Unit:Gently lift the indoor unit and hook it onto the mounting plate, ensuring all lines are neatly tucked behind it.
Install the Outdoor Unit:
Prepare Base:Place the outdoor condenser on a stable, level surface. A pre-cast concrete pad is ideal. If the unit was transported on its side, allow it to stand upright for at least 24 hours before operating to allow compressor oil to settle.
Positioning and Clearance:Ensure adequate clearance (12-18 inches around, 18-24 inches on fan side) for proper airflow and service access.
U-trap/Inverted Trap:If the outdoor unit is installed higher than the indoor unit (e.g., on a roof), an inverted trap must be constructed in the connection pipe before it enters the wall. This prevents rainwater from running along the pipe and siphoning into the indoor unit. If the outdoor unit is lower, ensure the drain hose has a continuous downward slope.
Route and Secure the Line Set:
Connect Lines:Run the bundled refrigerant lines, electrical wiring, and drain hose from the indoor unit to the outdoor unit. Keep the run as short as practical, as most single-zone systems support lineset runs of 25 to 50 feet.
- Protect Lines:Secure the line set along the exterior wall, ideally inside a PVC line cover (raceway) to protect it from weather and physical damage, and to maintain a clean aesthetic.
Connecting Refrigerant Lines, Electrical Wiring, and Drain Hoses
This is where precision and, for refrigerant, professional certification become crucial.
Refrigerant Line Connections:
Flaring:Use a flaring tool to create perfect flares on the copper refrigerant lines. Imperfect flares are a common source of leaks.
Torque Wrench:Connect the flared lines to both the indoor and outdoor unit service valves. Use a torque wrench to tighten the flare nuts to the manufacturer’s specified torque settings. Over-tightening can damage the flares, while under-tightening leads to leaks.
Test for Leaks:After connecting, it’s best practice to perform a preliminary leak test using a refrigerant leak detector before proceeding.
Electrical Wiring:
Dedicated Circuit:Ensure a dedicated circuit breaker and disconnect switch are installed for the outdoor unit, as required by local electrical codes.
Polarity-Sensitive Wiring:Connect the power and communication wiring between the indoor and outdoor units according to the manufacturer’s wiring diagram. This wiring is polarity-sensitive, typically using a 14/3 or 14/4 cable. Incorrect wiring can damage the system.
Safety First:Always disconnect power at the main breaker before performing any electrical work. Wait at least 10 minutes after turning off power before touching components to avoid residual electrical shock.
Condensate Drain Hose:
Slope:Route the drain hose with a continuous downward slope to ensure proper gravity drainage. Avoid kinks or upward loops that could create airlocks or standing water.
Insulation:Insulate the indoor portion of the drain hose with foam pipe insulation to prevent condensation from forming on its exterior.
Teflon Tape:Wrap the drain hose connection point firmly with Teflon tape to prevent leaks.
Outdoor Discharge:Ensure the drain hose discharges away from the foundation of your home to prevent water damage. Plug any unused drain holes with the provided rubber plugs.
Vacuuming the System, Releasing Refrigerant, and Testing
These are the most critical steps, legally requiring EPA 608 certification for refrigerant handling.
Vacuuming the System (Evacuation):
Purpose:This step removes all air and moisture from the refrigerant lines. Moisture can react with refrigerant to form corrosive acids, damaging the compressor.
Procedure:Connect a vacuum pump and manifold gauge set to the service ports on the outdoor unit. Pull a deep vacuum, aiming for a target of 500 microns.
Hold Test:Once 500 microns is achieved, close the manifold valves and shut off the vacuum pump. The system should hold the vacuum (stay below 1000 microns) for at least 10 minutes. If the vacuum rises, you have a leak that must be found and repaired before proceeding. This is often referred to as a “triple evacuation,” where the system is vacuumed, allowed to hold, and then potentially repeated to ensure thorough removal of contaminants.
Nitrogen Pressure Test:For added assurance, especially with R-32 systems, a nitrogen pressure test can be performed before This involves pressurizing the lines with oxygen-free nitrogen (OFN) and checking for pressure drops over time, indicating leaks.
Releasing Refrigerant:
Manufacturer Charge:Most mini split outdoor units come pre-charged with enough refrigerant for a standard line set length (e.g., 25 feet).
Procedure:Once the vacuum hold test is successful, open the service valves on the outdoor unit to release the refrigerant into the system.
Additional Charge:If your line set exceeds the pre-charged length, additional refrigerant will need to be added. This requires precise calculations and specialized equipment, making professional involvement essential.
System Startup and Testing:
Power On:Restore power to the unit.
Initial Test Run:Start the system in both cooling and heating modes (if applicable).
Check Performance:Monitor airflow, temperature differential, and listen for any unusual noises.
Drain Test:Verify that condensate is draining properly from the indoor unit.
Refrigerant Detection System (RDS):Modern R-32 units often have an RDS that performs self-tests. An E700 error code indicates the sensor needs replacement.
Ensuring Long-Term Performance, Safety, and Efficiency
A successful installation isn’t just about getting the unit running; it’s about ensuring it operates safely, efficiently, and reliably for years to come. This involves avoiding common pitfalls and understanding ongoing maintenance.
Common Mistakes to Avoid During Your Ductless Mini Split Installation
- Incorrect Sizing:As discussed, an improperly sized unit (too big or too small) will lead to short-cycling, poor humidity control, reduced efficiency, and a shorter lifespan. Always perform a proper load calculation.
- Skipping the Vacuum Step:This is perhaps the most critical mistake. Failing to thoroughly vacuum the refrigerant lines leaves air and moisture in the system, which can cause compressor failure, reduced efficiency, and costly repairs.
- Poor Refrigerant Connections:Over-tightening or under-tightening flare nuts, or creating imperfect flares, will lead to refrigerant leaks. Even slow leaks degrade performance and can damage the environment. A torque wrench is non-negotiable.
- Improper Condensate Drainage:A crooked indoor unit, a drain hose without a continuous downward slope, or kinks in the hose will cause water to back up and potentially leak into your home, leading to water damage and mold. Remember the downward angle for the wall hole and ensure a U-trap for outdoor units higher than indoor units.
- Burying Refrigerant Pipes Too Deep:If more than 36 inches of refrigerant pipe is buried underground without a proper vertical rise, refrigerant can migrate to the cooler buried section during shutdowns. This can lead to “slugging” – liquid refrigerant entering the compressor at startup, causing severe damage.
- Ignoring Electrical Codes and Safety:Improper wiring can cause electrical fires, shocks, and damage to the unit. Always ensure dedicated circuits, proper grounding, and adherence to local electrical codes.
- Neglecting Air Filtration:Air filtration should be integrated into the installation plan from day one. Installing a clean, properly fitted air filter before running the system protects the unit from construction dust and immediate buildup, ensuring optimal indoor air quality and system efficiency. Indoor air can be 2 to 5 times more polluted than outside air, making good filtration vital.
- Disregarding Manufacturer Instructions:Always defer to the specific manufacturer’s instructions for your model. They contain crucial details regarding clearances, wiring, torque settings, and refrigerant charging that are unique to your system.
A2L Refrigerant Safety: For systems using R-32 (A2L) refrigerant, safety protocols are even more stringent. A2L refrigerants are mildly flammable, requiring careful handling and installation in well-ventilated areas, free from ignition sources. Minimum room area calculations are essential to ensure that, in the event of a leak, the refrigerant concentration remains below flammable levels. Modern R-32 systems often include a Refrigerant Detection System (RDS) that automatically shuts down the compressor and runs the indoor fan to disperse gas if a leak is detected, but proper installation is the first line of defense.
Frequently Asked Questions About Mini Splits
As you consider a ductless mini split for your home, you likely have many questions. Here, we address some of the most common inquiries.
Can I install a mini split myself?
While the mechanical aspects like mounting units and drilling holes are often manageable for a skilled DIYer, the critical steps involving refrigerant lines and electrical connections typically require professional expertise. Federal law mandates EPA Section 608 certification for handling refrigerants. Many states also require licensed professionals for electrical work. A popular and often recommended approach is the “hybrid DIY,” where you handle the physical mounting and prep work, then hire a certified HVAC technician to complete the technical connections, vacuuming, refrigerant release, and electrical hookups. This ensures safety, code compliance, and preserves your warranty.
How long does a mini split installation take?
The duration of a mini split installation varies based on complexity and whether it’s a DIY or professional job.
- DIY Single-Zone:A straightforward single-zone DIY installation typically takes 4 to 8 hours for an experienced homeowner. First-time installers, however, may take longer.
- Professional Single-Zone:A professional installation of a single-zone system usually takes one full day (4 to 8 hours).
- Multi-Zone or Complex Projects:More complex multi-zone installations, projects requiring extensive line set runs, electrical panel upgrades, or challenging wall penetrations can take 1 to 3 days. A straightforward replacement of an existing outdoor unit and indoor head can often be completed in 4 to 8 hours.
Do mini splits work efficiently in cold weather?
Yes, modern mini split heat pumps are designed to work very efficiently in cold weather. Many models are rated to operate effectively down to 0°F (-18°C) or even lower, thanks to advancements in inverter technology and enhanced coils. If you live in a colder climate, such as the Twin Cities, look for units with a low-ambient heating rating. Some units also feature pan heaters to prevent condensate from freezing in the outdoor unit during extreme cold. While their efficiency might slightly decrease at very low temperatures compared to milder conditions, they remain a highly effective and energy-efficient heating solution for most winter climates.
Conclusion
Ductless mini split systems offer an excellent solution for targeted, energy-efficient heating and cooling, providing customized comfort without the need for extensive ductwork. As we’ve explored, a successful ductless mini split installation hinges on careful planning, precise execution, and a clear understanding of both DIY capabilities and professional requirements.
From accurately sizing your system and strategically locating units to meticulously connecting refrigerant lines, wiring, and drain hoses, every step plays a crucial role. The importance of proper vacuuming, leak testing, and adhering to safety protocols—especially with newer A2L refrigerants—cannot be overstated. Skipping these critical steps or making common mistakes can lead to reduced efficiency, costly repairs, and even safety hazards.
While a hybrid DIY approach can save on labor costs, we strongly recommend entrusting the technical aspects of refrigerant handling and complex electrical connections to a licensed HVAC professional. This not only ensures compliance with local codes and preserves your warranty but also guarantees the long-term performance, safety, and energy efficiency of your investment.
By following the guidelines outlined in this extensive guide, you’ll be well-equipped to make informed decisions for your home, leading to years of comfortable, efficient, and reliable climate control. Investing in a properly installed ductless mini split is an investment in your home’s comfort and your energy future.