Core Benefits of Epoxy Garage Floor Coatings
The garage is often more than just a place to park your car. For many of us, it serves as a workshop, a dedicated storage area, or even a creative space. However, the bare concrete floor in most garages often suffers from stains, cracks, and relentless dust, making the area feel unfinished and less functional.
Upgrading your garage floor can dramatically transform this often-overlooked space. We believe that a high-quality flooring solution not only enhances aesthetics but also significantly boosts functionality and durability, creating a more inviting and organized environment.
Epoxy garage coatings have long been a top choice for homeowners looking to protect and beautify their concrete floors. These robust coatings offer a seamless, attractive, and long-lasting finish that can withstand the daily demands of garage life.
In this comprehensive guide, we will explore everything you need to know about epoxy garage coatings. We’ll delve into their main benefits, the essential preparation steps, different coating types, and what to expect regarding cost and lifespan. We will also touch upon advanced alternatives, such as polyaspartic garage floor coatings, which offer unique advantages for specific needs and conditions. We aim to equip you with the knowledge to make an informed decision for your garage floor transformation.
When considering flooring options for a garage, epoxy coatings consistently stand out due to their exceptional performance characteristics. They offer a multitude of advantages that bare concrete or standard floor paints simply cannot match.
One of the most compelling benefits is their durability and strength. Epoxy coatings are not merely a paint; they are a thermosetting resin that, when properly mixed and applied, creates a hard, resilient surface. This makes them incredibly resistant to abrasion, chipping, and surface impacts. In fact, epoxy coatings are up to 10 times stronger than concrete itself, allowing them to easily withstand the weight of heavy vehicles, dropped tools, and constant foot traffic without showing significant wear. This enhanced strength translates directly into a longer-lasting floor that maintains its integrity and appearance for years.
Beyond physical toughness, epoxy floors offer superior chemical resistance. Garages are environments where spills are common – oil, gasoline, antifreeze, brake fluid, and various cleaning agents. Bare concrete absorbs these substances, leading to unsightly stains and potential deterioration. Epoxy creates a non-porous barrier that repels chemicals, making spills easy to wipe away without leaving a trace or damaging the floor. This also contributes to a cleaner, safer environment, as hazardous substances are less likely to seep into the concrete.
Another significant advantage is dust mitigation. Bare concrete floors are notorious for producing fine concrete dust, which can accumulate on vehicles, tools, and storage items, and even impact indoor air quality. Epoxy coatings encapsulate the concrete, effectively sealing the surface and reducing dust and allergens by up to 90% compared to an untreated concrete floor. This results in a much cleaner garage space and can be particularly beneficial for those with allergies or respiratory sensitivities.
Epoxy floors also boast excellent thermal stability, meaning they can handle temperature fluctuations without cracking or delaminating. This is crucial in garage environments that can experience extreme heat in summer and freezing temperatures in winter, depending on the climate.
From an aesthetic perspective, epoxy coatings offer a sleek, professional finish that instantly upgrades the look of any garage. Available in a wide array of colors, flakes, and metallic effects, they allow for significant customization to match personal style or home décor. The glossy finish also reflects light, making the space brighter and more inviting.
Finally, installing a high-quality epoxy garage floor can be a smart investment in your property. A professionally applied epoxy garage floor coating can increase a home’s resale value by up to 5%, making it an attractive feature for potential buyers who appreciate a clean, functional, and well-maintained garage.
To illustrate these points, consider the following comparison:
Feature Bare Concrete Floor Standard Garage Floor Paint Epoxy Garage Coating Durability Low Moderate High Impact Resist. Low Low-Moderate High Chemical Resist. Poor Moderate Excellent Stain Resist. Poor Moderate Excellent Dust Production High Low-Moderate Very Low Maintenance High (stains, cracks) Moderate Low Lifespan Indefinite (but degrades) 1-3 years 10-20+ years Aesthetics Basic, utilitarian Basic color High-end, customizable Resale Value None Minimal Significant boost Comparing Formulation Types and Alternative Systems
Understanding the different types of epoxy coatings available is crucial for selecting the right system for your garage. While all epoxy coatings share core benefits, their specific formulations dictate their performance characteristics, application methods, and suitability for various conditions.
Epoxy coatings are generally categorized by their composition, primarily based on the percentage of solids they contain and the type of carrier used.
Solid vs. Water-Based Epoxy Garage Floor Coatings
The primary distinction often lies between 100% solids epoxy and water-based epoxy (which are typically lower in solids content).
100% Solids Epoxy As the name suggests, 100% solids epoxy contains no solvents or water that evaporate during the curing process. This means that what you apply on the floor is what stays on the floor, resulting in a much thicker, more durable, and higher-build finish. These systems are known for their exceptional strength, chemical resistance, and longevity. They create a very robust, hard surface that can withstand the most demanding garage environments. However, they are generally more challenging to apply, have a shorter pot life (the time you have to work with the mixed material before it hardens), and typically emit stronger fumes during application. They are also less forgiving of moisture in the concrete.
Water-Based Epoxy Water-based epoxies use water as a carrier, making them easier to apply and clean up. They typically have lower volatile organic compound (VOC) levels, resulting in fewer fumes during application, which can be an advantage for DIYers or in poorly ventilated spaces. However, because water evaporates as the coating cures, the final film thickness is significantly thinner than 100% solids epoxy. This translates to less durability, lower impact resistance, and reduced chemical resistance compared to their 100% solids counterparts. While they offer a good aesthetic upgrade and some protection, their lifespan and performance are generally inferior, often performing more like a high-performance paint than a true industrial-grade coating. They are also generally more moisture-tolerant during application.
Solvent-Based Epoxy Less common for residential garage applications today due to VOC regulations and health concerns, solvent-based epoxies use chemical solvents as carriers. Like water-based systems, these solvents evaporate, leading to a thinner film build. While they can offer good adhesion and penetration, their high VOC content and strong fumes make them less desirable for indoor use.
Exploring Hybrid Systems and Advanced Topcoats
Beyond traditional epoxy formulations, the flooring industry has developed hybrid systems and advanced topcoats to address specific performance needs, particularly concerning UV stability and faster curing times.
Polyurethane Topcoats Many high-performance epoxy systems incorporate a polyurethane topcoat. While epoxy provides excellent hardness and chemical resistance, it can sometimes be susceptible to UV yellowing (a phenomenon where the coating discolors over time when exposed to sunlight) and can be less scratch-resistant than some other polymers. A polyurethane topcoat adds an extra layer of protection, enhancing scratch resistance, improving UV stability, and often providing a more uniform sheen.
Fast-Curing Alternatives: Polyaspartic Coatings For those seeking a floor that can be installed and returned to service much faster than traditional epoxy, or for areas with high UV exposure, polyaspartic garage floor coatings represent a significant advancement. Polyaspartic coatings are a type of polyurea that offer rapid cure times, often allowing for vehicle traffic within 24-48 hours, significantly reducing downtime. They boast superior UV resistance, meaning they won’t yellow or fade even with prolonged sunlight exposure, making them ideal for garages with large windows or outdoor applications. Furthermore, polyaspartics are highly flexible, offering better resistance to chipping and scratching, and are excellent at preventing “hot tire pickup” – a common issue where hot tires can delaminate or mar less robust coatings. While often more expensive, their benefits in terms of speed, durability, and UV stability make them a premium choice for many homeowners looking for the ultimate garage floor solution.
Choosing the right system involves balancing factors like budget, desired durability, aesthetic goals, and the specific environmental conditions of your garage.
Essential Surface Preparation and Application Steps
The longevity and performance of an epoxy garage coating are overwhelmingly dependent on proper surface preparation. Skipping or rushing these critical steps is the most common reason for coating failure, such as peeling, delamination, or bubbling. We cannot overstate the importance of thorough preparation.
The goal of preparation is to create a clean, dry, and porous concrete surface that the epoxy can bond to effectively. This involves several key stages:
- Cleaning the Concrete: The first step is to thoroughly clean the garage floor, removing all dirt, grease, oil, paint, sealers, and any other contaminants. This typically involves degreasing with a heavy-duty cleaner and scrubbing the surface. For heavily stained floors, multiple cleaning passes may be necessary. All cleaning solutions must be rinsed thoroughly, ensuring no residue remains.
- Repairing Cracks and Damage: Any cracks, spalls, or divots in the concrete must be repaired before applying epoxy. This usually involves grinding out the crack to create a V-shape, then filling it with an epoxy crack filler or repair mortar. Larger areas of damage may require more extensive patching. Allow all repairs to cure fully according to manufacturer instructions.
- Moisture Testing: Moisture is the enemy of epoxy. If moisture vapor transmission from the concrete slab is too high, it can lead to delamination and bubbling of the coating. We recommend conducting a moisture test, such as the calcium chloride test or using a moisture meter, to ensure the slab is dry enough for epoxy application. If high moisture is detected, a moisture mitigation primer may be required.
- Mechanical Profiling (Grinding): This is arguably the most crucial step. Mechanical profiling, typically achieved through diamond grinding, uses specialized equipment to abrade the top layer of concrete. This process serves several purposes:
- Removes Laitance: It strips away the weak, powdery top layer of concrete (laitance) that can prevent proper bonding.
- Opens Pores: It opens the pores of the concrete, creating a rough, sandpaper-like profile that allows the epoxy to mechanically interlock with the surface.
- Levels Imperfections: It helps to smooth out minor imperfections and create a more uniform surface.
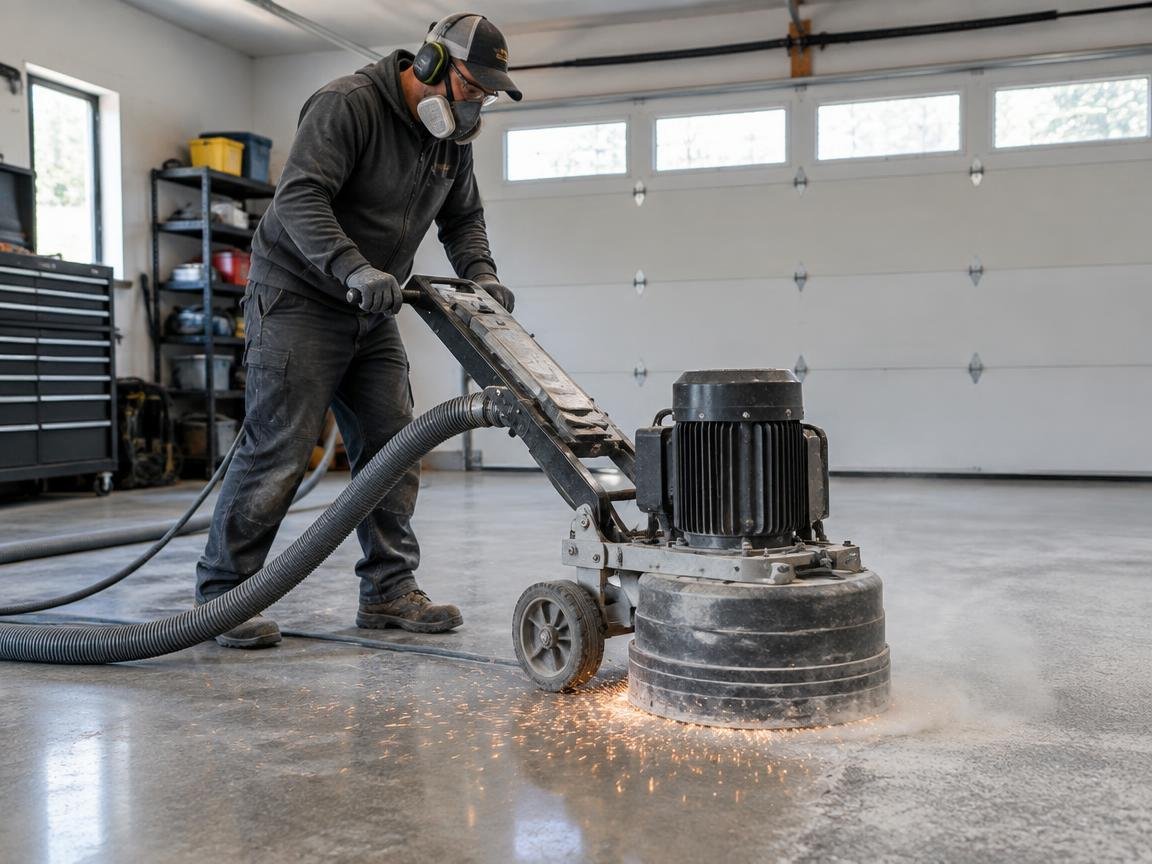
Diamond grinding is vastly superior to acid etching, which can leave behind salts that interfere with adhesion and often doesn’t create an adequate profile for high-performance coatings. Acid etching is generally only recommended for very light-duty coatings or as a last resort for DIY kits. For professional-grade results, mechanical profiling is essential.
- Vacuuming and Dust Removal: After grinding, the floor must be meticulously vacuumed with a HEPA-filtered vacuum to remove all dust and debris. Any remaining dust will prevent proper adhesion.
Step-by-Step Installation of Epoxy Garage Floor Coatings
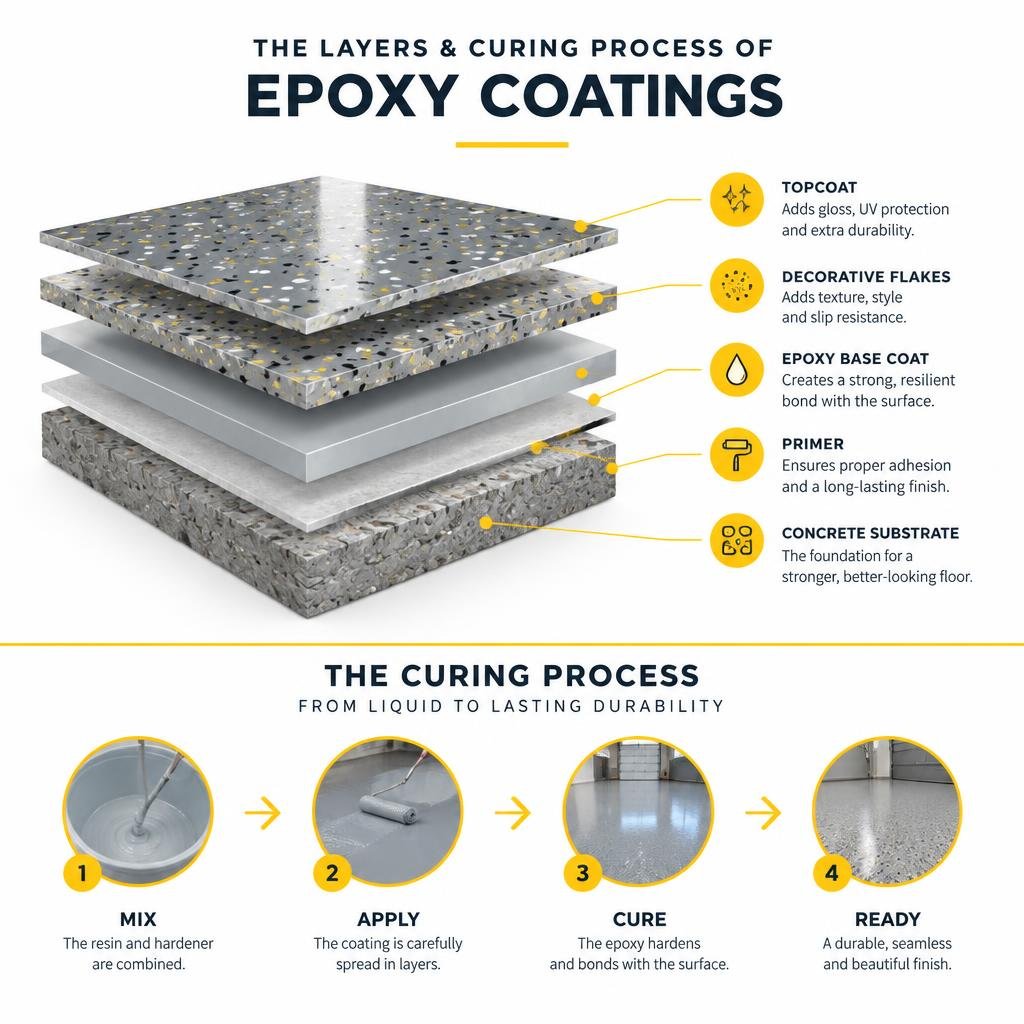
Once the surface is perfectly prepared, the epoxy application can begin. While specific steps may vary slightly depending on the product and desired finish, a typical multi-layer system involves:
- Primer Coat: A thin primer coat is often applied first. This layer penetrates deeply into the concrete, sealing the surface and enhancing adhesion for subsequent coats. It helps to prevent outgassing (small bubbles rising from the concrete) and ensures a strong bond.
- Base Coat: This is the main body of the epoxy system. The mixed epoxy resin is poured onto the floor and spread evenly with a squeegee, then back-rolled with a roller to ensure uniform coverage. If decorative flakes are desired, they are broadcast into this wet base coat. The amount and density of flakes will determine the final look.
- Decorative Flakes (Optional): If a flake system is chosen, decorative vinyl flakes are broadcast by hand into the still-wet base coat. These flakes provide aesthetic appeal, add texture for slip resistance, and help to hide minor imperfections. After the base coat has cured, any excess, unbonded flakes are scraped off and vacuumed away.
- Clear Topcoat: A clear topcoat is applied over the cured base coat and flakes. This layer provides additional protection against wear, chemicals, and UV radiation, and seals in the flakes. It also gives the floor its final sheen, which can range from high-gloss to satin.
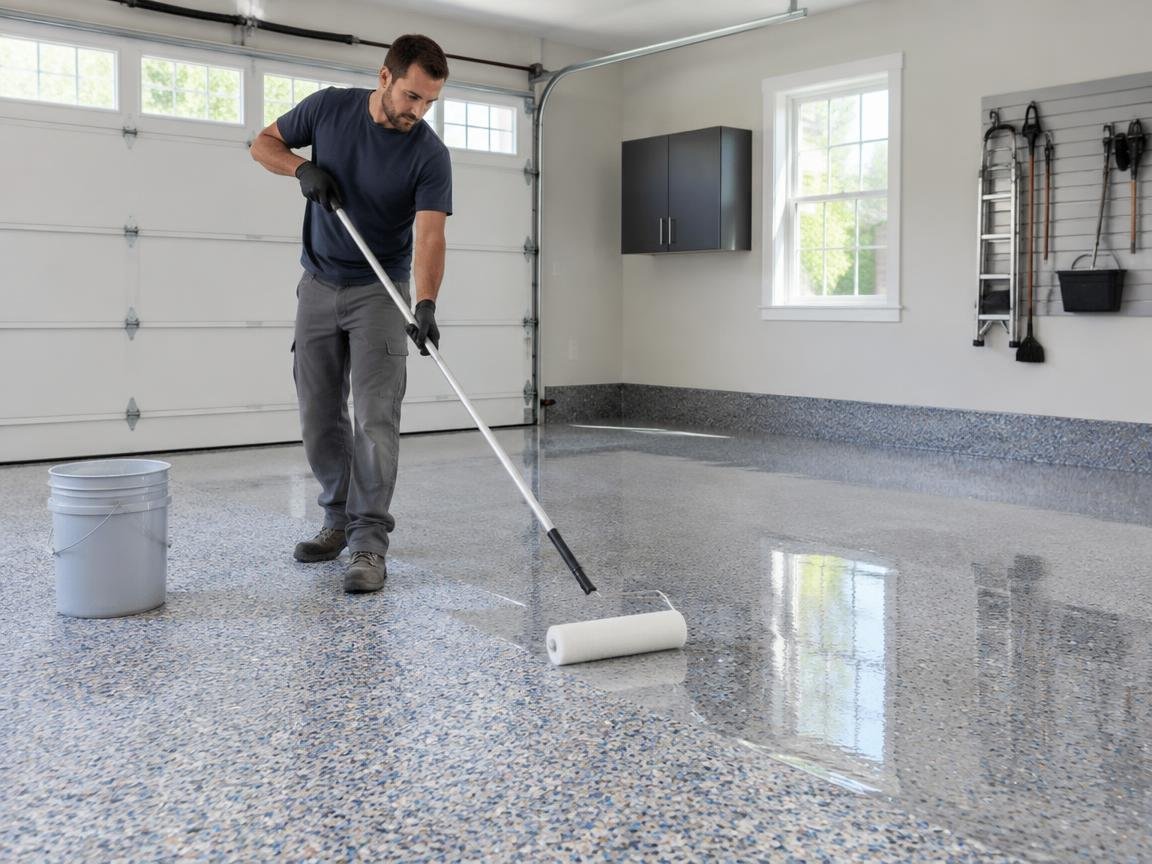
Curing Timeline: The curing process is critical. While the floor may be “tack-free” within hours, it takes significantly longer to reach its full hardness and chemical resistance.
- Foot Traffic: Typically allowed within 12-24 hours.
- Light Vehicle Traffic: Usually permitted after 48-72 hours.
- Full Cure: The coating typically achieves its full hardness and chemical resistance after 5-7 days, and sometimes up to 30 days for complete chemical cross-linking. It’s crucial to avoid heavy use, chemical spills, or dragging heavy objects during this full cure period. In September 2026, most advanced systems still adhere to these general guidelines, though some faster-curing polyaspartics can significantly reduce these times.
Critical Application Mistakes to Avoid
Even with the best materials, poor application can lead to disastrous results. Here are some common pitfalls to avoid:
- Inadequate Surface Preparation: As discussed, this is the number one cause of failure. Not cleaning, repairing, or profiling the concrete sufficiently will lead to delamination.
- Improper Mixing: Epoxy is a two-part system (resin and hardener) that must be mixed precisely according to manufacturer specifications. Incorrect ratios or insufficient mixing will prevent the epoxy from curing properly, resulting in soft spots or a sticky surface.
- Moisture Vapor: Applying epoxy to a concrete slab with high moisture vapor transmission will cause bubbles, blisters, and eventual delamination as the moisture tries to escape.
- Temperature Extremes: Applying epoxy in temperatures outside the manufacturer’s recommended range (typically 50-90°F or 10-32°C) can affect cure times, adhesion, and overall performance. Too cold, and it won’t cure; too hot, and it will cure too fast.
- Inadequate Ventilation: Especially with 100% solids or solvent-based epoxies, proper ventilation is essential to dissipate fumes and ensure a safe working environment.
- Applying Too Thinly or Too Thickly: Both extremes can compromise the coating’s durability and appearance. Follow spread rate guidelines carefully.
- Ignoring Pot Life: Epoxy has a limited pot life once mixed. Working beyond this window will result in the material becoming unworkable or curing improperly on the floor.
- Contamination During Application: Dust, debris, or insects landing on the wet epoxy can become permanently embedded, affecting the finish.
Cost Comparison: Professional Installation vs. DIY Kits
When considering an epoxy garage floor, one of the primary decisions homeowners face is whether to tackle the project themselves with a DIY kit or hire a professional installer. Both options have distinct cost implications and varying levels of outcome.
DIY Epoxy Garage Floor Coating Kits: DIY kits are appealing for their lower upfront cost. The average cost of a DIY epoxy garage floor coating kit ranges from $100 to $300 for a standard two-car garage (typically 400-500 square feet). These kits generally include a small amount of cleaner/etcher, a two-part epoxy coating, and sometimes decorative flakes and a clear topcoat.
Advantages of DIY:
- Lower Material Cost: The initial purchase price is significantly less than professional installation.
- Sense of Accomplishment: For handy homeowners, completing the project themselves can be rewarding.
Disadvantages of DIY:
- Limited Durability: Most DIY kits are water-based or very low-solids epoxy, meaning they are much thinner and less durable than professional-grade systems. They often have a shorter lifespan, sometimes only 1-3 years before showing significant wear, chipping, or delamination.
- Inadequate Preparation Materials: The etching solutions provided are often insufficient for proper concrete profiling, leading to poor adhesion.
- Lack of Expertise: Homeowners may lack the experience in surface preparation, crack repair, and proper application techniques, increasing the risk of common mistakes and coating failure.
- Equipment Rental: Specialized equipment like diamond grinders for proper profiling is rarely included and would need to be rented, adding to the overall cost and complexity.
- Warranty: DIY kits typically offer limited or no warranty on the finished product.
- Time Commitment: The process can be time-consuming, requiring multiple days for preparation, application, and curing.
Professional Epoxy Garage Coating Installation: Professional installation involves experienced technicians who use industrial-grade materials and specialized equipment. The cost for professional epoxy garage floor installation typically costs between $3 and $7 per square foot. For a standard two-car garage (400-500 sq ft), this would range from $1,200 to $3,500. This price usually includes all materials, labor, surface preparation (including diamond grinding), crack repair, and a warranty.
Advantages of Professional Installation:
- Superior Durability and Lifespan: Professionals use 100% solids epoxy or polyaspartic systems that are significantly thicker, stronger, and more chemical-resistant, offering a lifespan of 10-20 years or more.
- Expert Surface Preparation: They utilize industrial diamond grinders to ensure optimal concrete profiling, which is crucial for long-term adhesion.
- Quality Materials: Access to higher-grade primers, coatings, and topcoats not available in retail DIY kits.
- Expert Application: Experienced installers understand proper mixing, application techniques, and environmental factors, minimizing the risk of errors.
- Warranty: Reputable professionals typically offer warranties on their work, providing peace of mind.
- Time Savings: The project is completed efficiently, with minimal disruption to the homeowner.
- Aesthetics: Professional jobs often result in a more flawless, aesthetically pleasing finish.
Long-Term Value: While the initial cost of professional installation is higher, it often represents a better long-term value. A professionally installed epoxy floor lasts significantly longer, requires less maintenance, and performs better, avoiding the need for frequent reapplication or costly repairs down the line that are common with failed DIY attempts. Considering the potential increase in home resale value, the investment in a professional coating can be well justified.
Frequently Asked Questions About Garage Floor Coatings
We often encounter common questions from homeowners considering an epoxy garage floor. Here, we address some of the most frequent inquiries to provide clarity and help you make an informed decision.
How long do epoxy garage floors last?
The typical lifespan of an epoxy garage coating can vary significantly, but with proper installation and maintenance, these floors can last anywhere from 10 to 20 years, or even longer. Several factors influence this durability:
- Type of Epoxy: As discussed, 100% solids epoxy or polyaspartic systems installed professionally will far outlast thinner, lower-solids DIY kits.
- Surface Preparation: This is paramount. A properly prepared concrete slab ensures maximum adhesion and prevents premature delamination.
- Traffic and Use: Garages with heavy vehicle traffic (e.g., multiple vehicles, commercial use) or frequent impacts from heavy objects may experience wear faster than a garage used primarily for storage.
- Maintenance: Regular cleaning and adherence to maintenance guidelines (avoiding harsh chemicals, addressing spills promptly) contribute significantly to longevity.
- UV Exposure: While modern topcoats offer improved UV resistance, prolonged exposure to direct sunlight can still cause some yellowing or fading over many years, particularly with less UV-stable epoxy formulations.
- Environmental Conditions: Extreme temperature fluctuations, high humidity, or exposure to harsh chemicals can also impact the coating’s lifespan.
To maximize the lifespan, consider periodic resealing with a fresh topcoat every 5-10 years, especially in high-traffic areas or if minor wear begins to show.
How do you clean and maintain coated garage floors?
Maintaining an epoxy garage floor is remarkably simple compared to bare concrete, contributing to its appeal. The non-porous, seamless surface makes cleaning a breeze:
- Regular Cleaning: For routine maintenance, simply sweep or dust mop the floor to remove loose dirt and debris. A soft-bristle broom or a microfiber dust mop works best.
- Wet Cleaning: For deeper cleaning, use a mixture of warm water and a mild, pH-neutral cleaner. Avoid harsh chemical cleaners, abrasive scrubbers, or acidic solutions (like vinegar), as these can dull the finish or damage the coating over time. A deck brush or a soft-bristle brush can be used for scrubbing, followed by rinsing with clean water.
- Stain Removal: Most spills (oil, grease, chemicals) will sit on the surface and can be wiped up immediately with a cloth or paper towel. For dried stains, a mild degreaser or cleaner specifically designed for epoxy floors can be used. Avoid using steel wool or abrasive pads, which can scratch the surface.
- Scratch Prevention: While epoxy is durable, it’s not entirely scratch-proof. Use furniture pads under heavy items, avoid dragging sharp objects across the floor, and consider placing mats under vehicle tires in high-traffic areas to further protect the coating.
- Tire Marks: Hot tire pickup is largely mitigated by high-quality epoxy and polyaspartic coatings. However, if any rubber marks appear, they can usually be removed with a mild cleaner and a soft brush.
With minimal effort, your epoxy garage floor can maintain its pristine appearance for many years.
Are epoxy fumes dangerous during application?
The safety concerns and health risks associated with epoxy coatings primarily revolve around the application process, specifically the fumes (volatile organic compounds or VOCs) released during mixing and curing.
- VOCs: Most epoxy systems, particularly 100% solids and solvent-based varieties, emit VOCs. These can cause respiratory irritation, headaches, dizziness, and nausea in poorly ventilated areas. Water-based epoxies generally have lower VOC levels, but still require caution.
- Sensitization: Repeated or prolonged exposure to epoxy resins and hardeners can lead to sensitization, where an individual develops an allergic reaction to the chemicals, potentially causing skin rashes, itching, or respiratory issues.
- Skin and Eye Contact: Direct contact with uncured epoxy resin or hardener can cause skin irritation, burns, or allergic reactions. Splashes into the eyes can be serious.
Safety Precautions During Application:
- Ventilation: Proper ventilation is paramount. Ensure the garage doors and windows are open, and use fans to circulate air and exhaust fumes outdoors.
- Respiratory Protection: Wear an appropriate respirator with organic vapor cartridges to protect against inhaling fumes. Simple dust masks are not sufficient.
- Personal Protective Equipment (PPE): Always wear chemical-resistant gloves, long sleeves, long pants, and safety glasses or goggles to prevent skin and eye contact.
- Avoid Ignition Sources: Some epoxy components can be flammable, so eliminate all ignition sources (open flames, pilot lights, smoking) during application.
- Read SDS and Manufacturer Instructions: Always consult the product’s Safety Data Sheet (SDS) and the manufacturer’s specific instructions for detailed safety guidelines.
Once the epoxy has fully cured, it is considered inert and poses no ongoing health risks from off-gassing. The concerns are almost exclusively limited to the application and curing phases. Professional installers are trained in safe handling and application practices, minimizing risks.
Conclusion
Transforming your garage floor with an epoxy coating is more than just a cosmetic upgrade; it’s an investment in the functionality, durability, and overall value of your home. We’ve explored the myriad benefits, from superior strength and chemical resistance to significant dust reduction and enhanced aesthetics. Understanding the nuances between different epoxy formulations, the critical importance of surface preparation, and the long-term value proposition of professional installation versus DIY kits empowers you to make an informed choice.
While the initial cost may seem higher for professional services, the extended lifespan, superior performance, and peace of mind offered by a expertly installed, industrial-grade epoxy or polyaspartic system often make it the most cost-effective solution in the long run. With proper care, your new epoxy garage floor will not only withstand the rigors of daily use for well over a decade but will also elevate your garage from a utilitarian space to a clean, bright, and highly functional extension of your home. It’s a decision that will continue to pay dividends in both practicality and pride of ownership for many years to come.